CNTK - The Microsoft Cognitive Toolkit - is a unified deep-learning toolkit by Microsoft. This time we will using CNTK to run up a MNIST Classifier and test it by our selected image.
CNTK - 微軟認知工具(?) - 是一套微軟的整合性深度學習工具。這次我們將使用CNTK來執行一個MNIST分類器,並使用我們所選擇的圖片進行測試。
Due to Microsoft didn't provide much CNTK support for C#, so the best way is start from the CNTK C#/.NET API training examples, in here you can get some code example for training/validate model and the dataset that you need for training/validate. Copy example code to get a new post not my sytle, so I will skip it, assume you already get all things complete and let the MNISTClassifier model trained done.
由於微軟沒有提供很多C#的CNTK支援,所以最佳的方式是從CNTK C#/.NET API training examples這範例開始,在這裡你可以取得一些訓練/驗證模型的程式範例,還有訓練/驗證所需的資料。拷貝範例程式就生出一篇新的文章不是我的風格,所以我會跳過這段,假設你已經取得所有東西而且訓練好MNISTClassifier的模型了。
In Microsoft's example, you can't find how to load one image and evaluate it by pre-trained model, it only show up using MinibatchSource to validate it. After very long time search and study, finally I found a way to load image to test model without make MinibatchSource.
在微軟的範例裡,你找不到如何讀取一張圖片然後用訓練好的模型去算出結果,範例只有教怎麼用MinibatchSource去做驗證。經過很長時間的搜尋跟研究,我終於找到一個方法可以不透過MinibatchSource就讀入圖片並用模型測試。
Here is my example code, at first, choose GPU as our calculate device and set model and input image's file location.
接下來就是我的範例,首先,選擇GPU作為計算裝置,然後填好模型跟輸入圖片的檔案位置。
            DeviceDescriptor device = DeviceDescriptor.GPUDevice(0);

            string modelFile = "MNISTConvolution.model";
            string imageFile = "3.png";
Then, create a CNTK Value object from our input image. To do it, we need convert image to float array, it is not hard, but note I used Cv2.BitwiseNot to inverse image, because the dataset that we training MNISTClassifier model are black background, but our input image is white background.
然後,將我們輸入的圖片轉成CNTK Value物件。要做到這個,我們必須將圖片轉成浮點數陣列,這不難,但注意我有用Cv2.BitwiseNot將圖像反轉,因為訓練MNISTClassifier模型的資料是黑色背景的,而我們輸入的圖片是白色背景。
            int height = 28, width = 28;
            int[] imageDim = {height, width, 1};
            var org = Cv2.ImRead(imageFile, ImreadModes.GrayScale);
            var image = new Mat();
            Cv2.BitwiseNot(org,image);
            var img = new float[height * width];
            for (int i = 0; i < height; i++)
            {
                for (int j = 0; j < width; j++)
                {
                    img[i * height + j] = image.At(i, j);
                }
            }
            var imageBatch = Value.CreateBatch(imageDim, img, device);
After input image ready, we can setup model and evaluate the result.
輸入圖片準備好後,我們就可以設定模型然後計算結果了。
//load model
Function model = Function.Load(modelFile, device);
//setting
var inputDataMap = new Dictionary {{model.Arguments[0], imageBatch}};
Variable outputVar = model.Output;
var outputDataMap = new Dictionary {{outputVar, null}};
//evaluate result
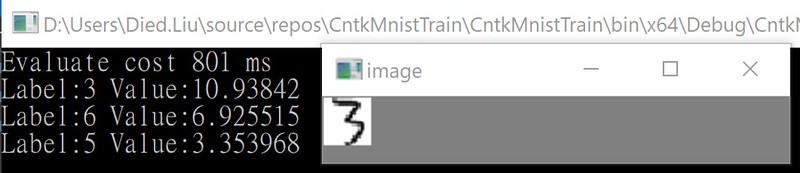
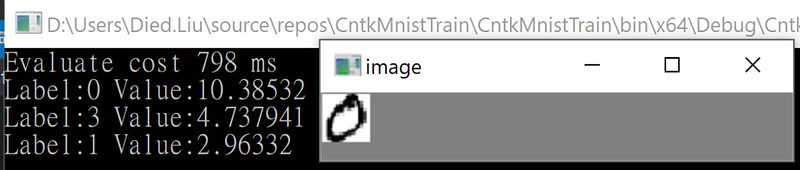
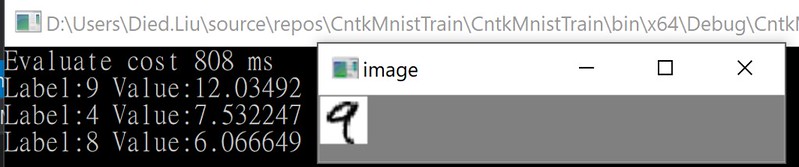
model.Evaluate(inputDataMap, outputDataMap, device); The result will be a list of 10 value (0~9), higher value mean higher chance, we only print out top 3 result.
結果將是10個數值(0〜9)的列表,值越高意味著越高的可能性,這裡我們只印出前3個結果。
            //get result
            var outputVal = outputDataMap[outputVar];
            var actual = outputVal.GetDenseData(outputVar).First();

            //get top 3 label
            var actualLabels = actual.Select((x, index) => new {label = index, value = x}).ToList();
            var list = actualLabels.OrderByDescending(x => x.value).Take(3);
            foreach (var v in list)
            {
                Console.WriteLine($"Label:{v.label} Value:{v.value}");
            }
Here is other test result.
這裡是其他的一些測試結果。

Full code here.
完整程式碼。
using System;
using System.Collections.Generic;
using System.Diagnostics;
using System.Linq;
using CNTK;
using OpenCvSharp;

namespace CntkMnistTrain
{
    class Program
    {
        static void Main()
        {
            DeviceDescriptor device = DeviceDescriptor.GPUDevice(0);

            string modelFile = "MNISTConvolution.model";
            string imageFile = "3.png";

            #region prepare test image
            int height = 28, width = 28;
            int[] imageDim = {height, width, 1};
            var org = Cv2.ImRead(imageFile, ImreadModes.GrayScale);
            var image = new Mat();
            Cv2.BitwiseNot(org,image);
            var img = new float[height * width];
            for (int i = 0; i < height; i++)
            {
                for (int j = 0; j < width; j++)
                {
                    img[i * height + j] = image.At(i, j);
                }
            }
            var imageBatch = Value.CreateBatch(imageDim, img, device);
            #endregion

            //load model
            Function model = Function.Load(modelFile, device);

            //setting
            var inputDataMap = new Dictionary {{model.Arguments[0], imageBatch}};
            Variable outputVar = model.Output;
            var outputDataMap = new Dictionary {{outputVar, null}};

            Stopwatch sw = new Stopwatch();
            sw.Start();

            //evaluate result
            model.Evaluate(inputDataMap, outputDataMap, device);

            sw.Stop();
            Console.WriteLine($"Evaluate cost {sw.ElapsedMilliseconds} ms");

            //get result
            var outputVal = outputDataMap[outputVar];
            var actual = outputVal.GetDenseData(outputVar).First();

            //get top 3 label
            var actualLabels = actual.Select((x, index) => new {label = index, value = x}).ToList();
            var list = actualLabels.OrderByDescending(x => x.value).Take(3);
            foreach (var v in list)
            {
                Console.WriteLine($"Label:{v.label} Value:{v.value}");
            }

            //display image
            using (new Window("image", org))
            {
                Cv2.WaitKey();
            }
        }
    }
}
Hope you enjoy it.
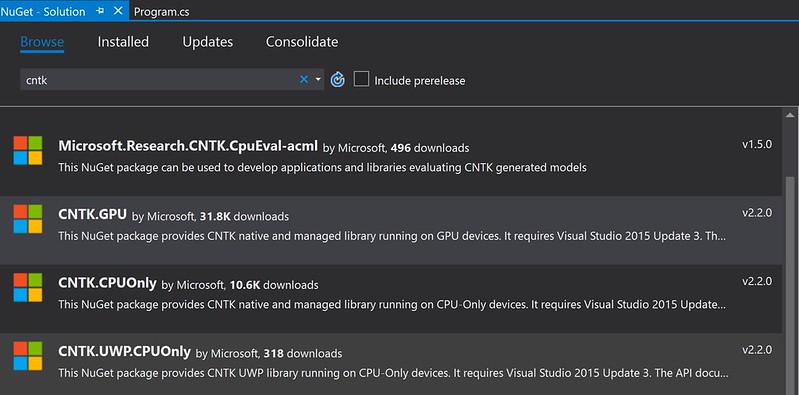
BTW, if using Visual Studio, you can get CNTK from nuget.
順帶一提,如果用Visual Studio的話,你可以從nuget取得CNTK。
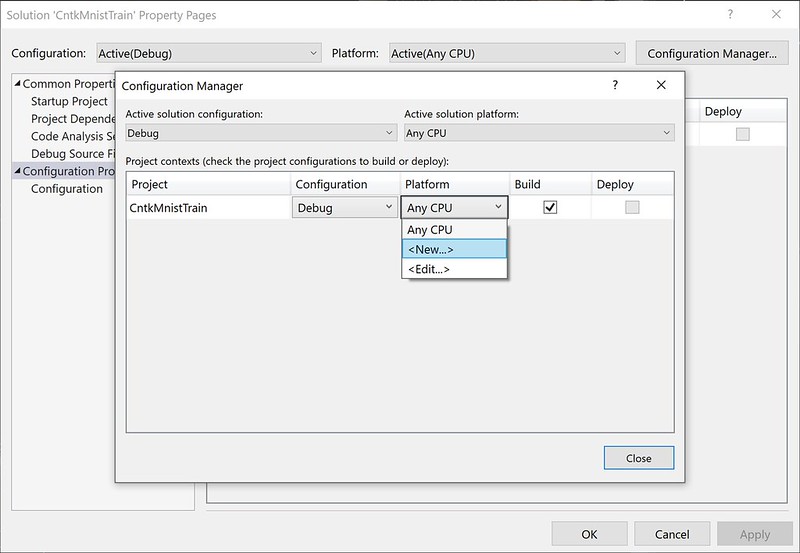
And the solution platform need set to x64, you can setup it at here.
然後專案平台要設成x64,你可以在這邊設定。

No comments:
Post a Comment