This is a tiny side project using OpenCv(actually, OpenCvSharp) Background Subtraction methods to solve find difference game's image.
這是一個用OpenCV(實際上是OpenCvSharp)的Background Subtraction功能來解找出差異遊戲圖片的小專案。
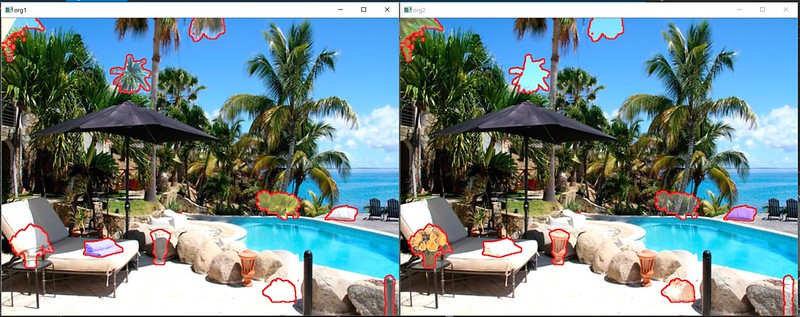
Test picture found from google play, thank APP Find Differences 200 levels
測試圖片是從google play上找到的,感謝APP 尋找差異200關
At first, create background subtraction method, I choose BackgroundSubtractorMOG2 this time, you can try other methods then pick one to use it. After apply two image, we got a mask to show two image's different.
首先,創建background subtraction方法,我這次選擇用BackgroundSubtractorMOG2,你可以試試別的方法然後挑一個用。跑過兩張圖片後,我們就可以得到這兩張圖的差異遮罩。
            //create background subtraction method
            var mog = BackgroundSubtractorMOG2.Create();
            var mask = new Mat();
            mog.Apply(org1, mask);
            mog.Apply(org2, mask);
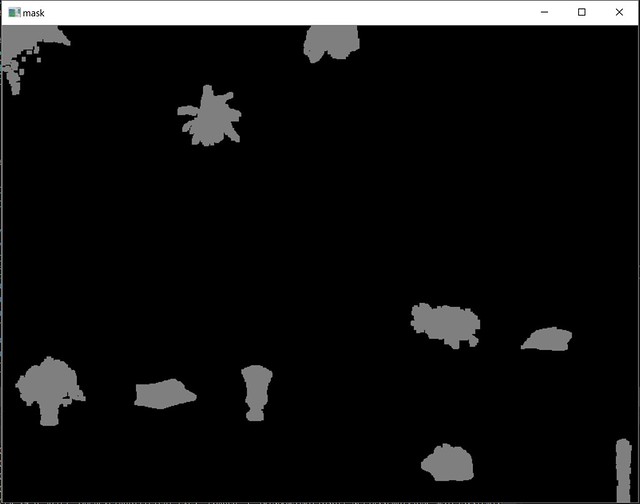
Because this two picture not exactly the same, so after background subtraction done, the mask shows some different spot and a lot of noise, we can use Morphology to remove those noise.
因為這兩張照片不是完全一樣,所以在經過background subtraction後,遮罩上除了顯示差異區塊,也還有很多噪點,我們可以用Morphology去移除這些噪點。
            //reduce noise
            Cv2.MorphologyEx(mask,mask,MorphTypes.Open, null,null,2);
After remove noise, we can see clear 10 different place.
移除噪點後,我們可以清楚的看出十個不同處。
Now we try to apply the mask to original image to get better user experience.
現在我們試著將遮罩貼回原圖,看能不能更好看。
            //convert mask from gray to BGR for AddWeighted function
            var maskBgr = new Mat();
            Cv2.CvtColor(mask, maskBgr, ColorConversionCodes.GRAY2BGR);

            //apply two image as one
            Cv2.AddWeighted(org1, 1.0, maskBgr, 0.5, 2.2, org1);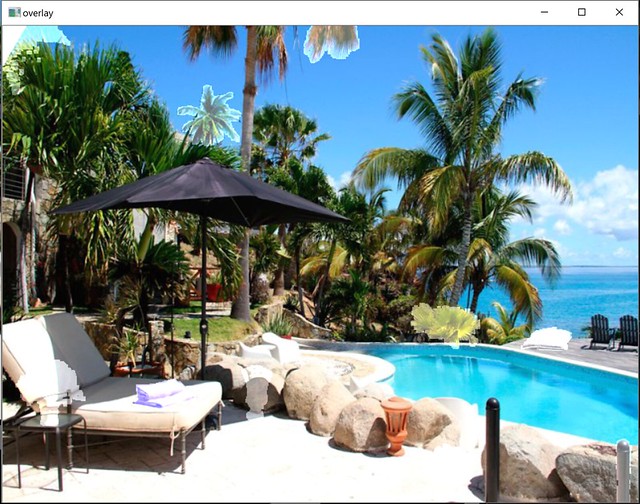
But as you saw, applied transparent mask layer don't get good effect. So I decide to draw contours make the different area more obviously.
但如你所見,貼上透明遮罩後的效果不太好,所以我決定繪製輪廓讓有差異的區域更加明顯。
var canny = new Mat();
Cv2.Canny(mask, canny, 15, 120);
Cv2.FindContours(canny, out var contours, out var _, RetrievalModes.External, ContourApproximationModes.ApproxSimple);

Cv2.DrawContours(org1, contours, -1, Scalar.Red, 2);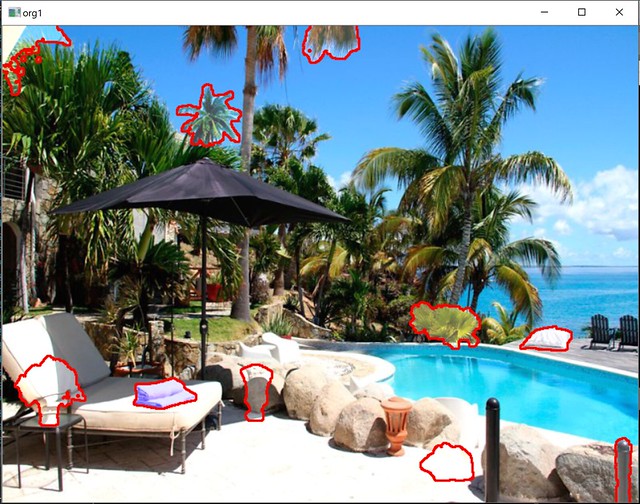
With contours, now we can find out difference area easily.
有輪廓後,現在我們可以很容易地找出差異區域。
Full code was here, or you can get it from github OpenCvFindDifferent.
完整程式碼如下,或是你可以在github OpenCvFindDifferent取得。
using OpenCvSharp;

namespace OpenCvFindDifferent
{
    class Program
    {
        //test image from https://play.google.com/store/apps/details?id=com.vizalevgames.finddifferences200levels
        //thank for that
        static void Main()
        {
            var org1 = new Mat("1.jpg");
            var org2 = new Mat("2.jpg");

            //create background subtraction method
            var mog = BackgroundSubtractorMOG2.Create();
            var mask = new Mat();
            mog.Apply(org1, mask);
            mog.Apply(org2, mask);

            //reduce noise
            Cv2.MorphologyEx(mask,mask,MorphTypes.Open, null,null,2);

            //convert mask from gray to BGR for AddWeighted function
            var maskBgr = new Mat();
            Cv2.CvtColor(mask, maskBgr, ColorConversionCodes.GRAY2BGR);

            //apply two image as one
            Cv2.AddWeighted(org1, 1.0, maskBgr, 0.5, 2.2, org1);
            Cv2.AddWeighted(org2, 1.0, maskBgr, 0.5, 2.2, org2);

            #region draw contours
            var canny = new Mat();
            Cv2.Canny(mask, canny, 15, 120);
            Cv2.FindContours(canny, out var contours, out var _, RetrievalModes.External, ContourApproximationModes.ApproxSimple);

            Cv2.DrawContours(org1, contours, -1, Scalar.Red, 2);
            Cv2.DrawContours(org2, contours, -1, Scalar.Red, 2);
            #endregion

            using (new Window("org1", org1))
            using (new Window("org2", org2))
            using (new Window("mask", mask))
            {
                Cv2.WaitKey();
            }
        }
    }
}
Hope you enjoy it.

No comments:
Post a Comment